Garden Tractor Forums banner

1964 LandLord 314 Project. [Complete]

21K views 109 replies 12 participants last post by  wbakunis  
#1 ·
This might be a very long write up.

I'm currently working on a 1964 Simplicity LandLord 314 (990314) with a hydraulic Lift (990339). It was given to me about 1 month ago and I was told it was well taken care of. Sadly this isn't the case. The LandLord is in rather rough shape. It never got regular TLC besides motor oil changes.

Issues:

  • Transmission Leaking from flange gasket & oil seals. (#1 Priority)
  • Loose wheel hub.
  • Hydraulic needs to be repacked. (Currently finding o-rings)
  • Hydraulic pump needs new seals & o-rings but isn't mandatory. I just want to do it. (Currently finding o-rings)
  • Worn out drive shaft plate (Fixed)
  • Carburetor needs a rebuild (Done)
  • Gas tank is slightly rusted inside.
  • Gas tank drain spout broke. Need to backout old pipe tip and find new pipe.

Whats Good:

  • Engine runs beautifully.
  • Generator is charging battery correctly
  • Hydraulic Pump works perfectly without leaking
  • Tires are holding air
  • Barely any rust. Just a little surface rust on front rims. Whole tractor is just covered in oil and grease.

Tractor Numbers:

  • Main - 990314
  • Hydraulic Lift - 990339
  • Tiller 36" - 1690039
  • Tiller Lift - 1690045
  • Tine Extension - 1600419

________________________________________

Transmission:

I should have all the tools myself to tear it apart and fix the seals & the gasket. I found that it had no oil so I filled it up and took the tractor for a spin. Everything went fine. I only noticed a small leak around the Oil Seals. Next morning I go out and find that all the oil dripped out from the bottom.

Parts I ordered:


What are some tips or suggestions to properly taking the seals out and fixing the gasket?
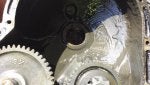
Wheel Hub:

I'm genuinely worried about this part. While taking the left-rear tire off, I noticed it was moving freely (forward & back) without the axle moving. I found that the wheel hub wasn't tightly attached to the axle. Both bolts were loose and the keyway appeared to be sheared. I had to use a pully puller to remove the hub. I backed both the hub bolts out and found that they are stripped. The bolts need to be replaced and I need to retap the threads.
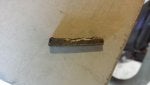
  • The keyway wasn't sheared but was heavily damaged.
  • The axle is also damaged. One of the hub bolts wore down a groove on the axle.

Keyway


Wheel Hub


Axle


Hydraulic & Pump:

I've got this under control. Its' not that difficult to repack the cylinder and rebuild the pump. Ill be doing later during next month (october 2015) anyways.
 

Attachments

#2 ·
The rear axle is the only thing that is really concerning. I went thru this on dads tractor when I restored it, if you can weld and have access to a machine shop than all the damage that was caused can be fixed. you can weld up the axle shaft to repair that then cut the key way on a Bridgeport. the hub you may be better of to replace. I fixed dads by drilling the center out and welding a bushing in there then re-drill the center hole and cut the key slot in there with broaches.

the axle shaft should slide rite out of that rear diff without taking it apart. If I remember you have to take the collar of the left side then remove the rite side hub. then you should be able to pull the axle out from the rite side, be careful the posi gears don't come out they can be a pain to get back in correctly.

You can check the manuals section here for more info.

Pete
 
#3 ·
As far as the seals, I imagine you mean the axle seals. A good seal puller or even a long flat blade screw driver can usually be employed to get them out of their bores. What I usually do is put a thin layer of either silicone gasket maker or thread locker on the outside surface of the seal where it sits it the bore. There is another Loctite product (648 retaining compound) made just for that purpose but not always as easy to find at the parts store as the other stuff. Not always necessary but nice insurance. Don't forget to lube the inner seal lip with some axle grease before installing the seals and make sure you drive the seal in squarely with the proper size driver or a three point (triangle pattern) sequence with a wide punch or 2x4 around the edge of the seal to avoid damaging the seals. As for the damaged keyway in the hub and axle, the best option would be to replace them if you're lucky enough to find some good ones. Other than that, a trip to the local machine shop might be in order to have the keyways filled in with weld and re-broached. Maybe someone else out there has another suggestion for those but that is what would work best in my opinion. There are some other things you could try, including JB Weld, but I don't know what kind of longevity you would get from those options. Hopefully, someone who has used one of the "other options" will chime in with their experience and results.
 
#4 ·
The rear axle is the only thing that is really concerning. I went thru this on dads tractor when I restored it, if you can weld and have access to a machine shop than all the damage that was caused can be fixed. you can weld up the axle shaft to repair that then cut the key way on a Bridgeport. the hub you may be better of to replace. I fixed dads by drilling the center out and welding a bushing in there then re-drill the center hole and cut the key slot in there with broaches.

the axle shaft should slide rite out of that rear diff without taking it apart. If I remember you have to take the collar of the left side then remove the rite side hub. then you should be able to pull the axle out from the rite side, be careful the posi gears don't come out they can be a pain to get back in correctly.

You can check the manuals section here for more info.

Pete
Theres a few machine shops around. Ill have to give them a call, do some pricing and see if they have a bridgeport machine. Ill let them do both the welding and machining. We have a Mig welder but don't have much experience.

Yea, I was able to get the axle to slide partially out but stopped myself. After looking at the parts manual, i'm worried about the drive gear and keyway dropping inside. I need to apply permatex anyways so ill split it open.

As far as the seals, I imagine you mean the axle seals. A good seal puller or even a long flat blade screw driver can usually be employed to get them out of their bores. What I usually do is put a thin layer of either silicone gasket maker or thread locker on the outside surface of the seal where it sits it the bore. There is another Loctite product (648 retaining compound) made just for that purpose but not always as easy to find at the parts store as the other stuff. Not always necessary but nice insurance. Don't forget to lube the inner seal lip with some axle grease before installing the seals and make sure you drive the seal in squarely with the proper size driver or a three point (triangle pattern) sequence with a wide punch or 2x4 around the edge of the seal to avoid damaging the seals. As for the damaged keyway in the hub and axle, the best option would be to replace them if you're lucky enough to find some good ones. Other than that, a trip to the local machine shop might be in order to have the keyways filled in with weld and re-broached. Maybe someone else out there has another suggestion for those but that is what would work best in my opinion. There are some other things you could try, including JB Weld, but I don't know what kind of longevity you would get from those options. Hopefully, someone who has used one of the "other options" will chime in with their experience and results.
Replacing the seals doesn't sound too bad. Ill just use some grease. Ill go with the machine shop option. I don't want to tear the tractor down again anytime soon.
 
#5 ·
You may be a bit surprised by the cost of a machine shop, look around for parts. sometimes you can find an entire parts machine for reasonable and then you have lots of parts. there are also some great suppliers on here that can get you brand new stuff.

Pete
 
#8 · (Edited by Moderator)
Today I spent the day working on the seals and the gasket. Didn't go well at all. First mistake I made was not taking enough pictures while tearing it down. Second mistake was not having a proper work bench / area. After putting it back together, the brake is locked up and the axle won't spin freely / hung up. Also looks like the axle is way too far off to the left. I think this is why the axle isn't moving freely. I didn't run the tractor. I don't think I ruined anything by hand cranking it. Tomorrow I take it apart again.

Found out that I need another part. The drive pulley on the rear end is broken. Could wear down the belt quickly.

Drive Pulley - Simplicity 154272


Attachments

#10 ·
check to make sure all the gears and shafts are all seated correctly in the trans, kind of tricky to get everything together. the cover should go on and fit down flush without any trouble before you tighten the bolts. Not sure about that mulled drive, doesn't look like what I have but the newer ones are different.

Pete
 
#11 · (Edited by Moderator)
I was able to take it apart again today. Didn't find anything in the wrong place. I tried being more careful about the axle adjustment while putting it back together. Its' cranking over fine by hand now. I'm waiting till tomorrow to put 90w oil in. Let the permatex setup and dry. My guess is that the axle was pinching from not being lined up right.

Tomorrow I want to work on the bevel gearbox.
 
#12 · (Edited by Moderator)
I forgot to mention in my last post that it won't roll in neutral. 1-3 & R work fine. I didn't drive it. Just hand cranked the pulley. Could it not roll due to no oil or did I mess up again?

EDIT: I finally fixed it around 6:30pm. I had one of the axle spacers upside down and was rubbing against the snap ring. This took up about 1/16th space. Flipped it around and there was an inset on it. The spacer would slip over top the snap ring. Gonna get a frost tonight so ill seal the rear-end in the morning.
 
#13 ·
Today I changed the oil in the motor. There was only about a quart in it. Book wants 2 quarts. Also filled up the rear-end with 90w to the second screw plug. Now I just need to find o-rings for the hydraulic piston and fix the gas tank.

  • What holds the seat up when you want to work in the back? Right now I put a wire on the frame and tied it to the seat's frame to prevent it from falling all the way back.
  • What holds the front of the hood on? Is it another set of two bolts like near the dash? Previous owner drilled a hole in the hood and put threaded rod through it.


Nothing major but i'm looking for the battery cover panel.
 

Attachments

#15 · (Edited by Moderator)
That "mule part" is actually the idler pulleys needed to run the rear tiller. If you download the operator's manual for the tiller from the Simplicity website it will show how they are attached on the rear lift stub.
Yea, I was able to find out how it works. Raising and lowering the tiller tightens / loosens the belt. To engage the tiller, you pull the handle on top the tiller. This tiller is meant for something newer. I was told it works fine. Next year I need to find out for myself.
 
#16 · (Edited by Moderator)
Today I decided to tackle the hydraulic cylinder problem. There is no local hydraulic shops so I had to drive down to terryville connecticut. I was worried that the seals were going to cost quite a bit. In total, the seals cost $13.43 and surprisingly they didn't charge for labor. They asked if they could install the seals. I wasn't going to say no. Last time I tried putting seals in, I ruined one.

1964 Simplicity Hydrolift 990339

Seals List

Quantity | Seal Number | Price | Gasket Location

  • One | 2-112 N-70 | $1 | Bladder Seal
  • Two | 2-023 N70 | $2 | End Caps
  • One | TPO15 - Piston T Seal 1 1/4 x 1 x 3/16 | $10.43 | Ram Head

Next thing on the todo list is fix the gas tank. I need to rethread the tank spout and put a shut off on it.

I also ordered a missing body panel and the lift lever arm for the mower deck.
 
#17 ·
I have a few parts for a 314. Not many, though.
 
#19 ·
No help there for you!
 
  • Like
Reactions: wbakunis
#21 · (Edited by Moderator)
Mostly odds and ends. If I get time later, I'll see if I can find the pics I had posted earlier this year.

Here's the band around the tank. It is 1/16" thick X 3/4" wide X 23-1/2" total length. The 90° bend with hole is 3/4". The threaded stud is 1-1/4" long.


I do have a pair of decent foot boards with the rubber still on one them.

Found my For sale ad!
 

Attachments

#22 · (Edited by Moderator)
Tractor is pretty much back together now. The two parts I ordered arrived in the mail and I've installed them. I ordered the battery cover and a lift lever arm. Both of these parts are from a B10. After I get the snowplow hooked up, Ill start painting everything. Ill be painting the Allis B10 parts, with the correct yellow paint. I could easily make the whole tractor match up but then Ill feel like im destroying those parts.

Ill be using my extra Sears suburban plow for now until i can find the correct snowplow for the landlord. The sears plow has a custom frame and need to be tweaked so it will work for on here.


Attachments

#24 ·
I still need to get pics of what I have for a 314! The show has my full attention this weekend!
 
#25 ·
Small update

Got the gas tank retapped and I have a new valve on order. The current one is leaking now. I put fuel in the tank and the float is stuck open. Gas is flowing down into the neck of the air filter. I took the carb apart and found a bunch of gray mush of sorts. It got cold quickly so ill work on it early tomorrow morning.


Attachments

#26 ·
you wont hurt those parts painting them to match . ( they can be repainted )

people who dont know better will think you have a frankenstien tractor if they see yellow on an orange tractor :thumbs:

it would destroy them if you painted them joan dear green though ... :bigrofl:

good ole ethenol scrung in that there carb or maybe lime deposits from using "heet" . had one full of hard white chunks and it ate the casing away