Garden Tractor Forums banner

Red 682 & 44c Rebuild

9.9K views 74 replies 14 participants last post by  twostep  
#1 · (Edited by Moderator)
*edit* I'm adding the GT rebuild to this thread too.

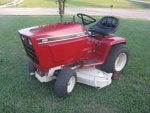
The 44C that was on my 682 was REALLY noisy when I got it so I decided to go ahead and rebuild it... then I saw how much the replacement spindles were ($70 each) and didn't even include new spindle cups or anything else. So I decided to just keep an eye out for a decent deck and if nothing popped up I would get the new spindles before spring. Here is my GT:


Here is what the deck looked like after I cleaned it up... LOTS of deep rust pitting but only one little spot rusted through, also one of the brackets was boogered up pretty good on a past repair:


Yesterday I stumbled upon a deck on CL that was only about 20 minutes away. The CL pic looked decent and the guy said the spindle felt good and tight. I picked it up for only $25. Got it stripped down and sure enough the spindles are in great shape. The deck was toast but all the bolted on parts were in really good shape, it must have been rebuilt somewhere along the line. Plus you can't beat that price!


Next up is to repair the hacked up bracket and I might move the two front wheel brackets onto my older 44C. I've got a buddy down the street that I'm going to have sandblast all the corners that I couldn't get the wire wheel.
 

Attachments

#3 ·
Sounds like you have it going your way. In the first pic of the 'new' deck, what is that piece at the bottom of the pic? A PO add-on?
 
#4 ·
Nice looking tractor. I had to do the opposite for my MF8 deck. The shell was a wreck but I managed to find another one locally. Looks like you'll be ready for mowing season this spring.
 
#5 ·
Sounds like you have it going your way. In the first pic of the 'new' deck, what is that piece at the bottom of the pic? A PO add-on?
Kenny,

That piece is basically a backing plate that goes on top of the main deck shell. See the diagram. This piece was in really good shape even though the deck shell was rusted through under it.
 

Attachments

#6 ·
Thank you! That does look much better, that is why I asked. Thought the PO had made that to hold it together.
 
#7 ·
Got all of the deck parts cleaned up and put on coat of primer. I'm a big fan of the rustoleum heavy rust primer, it really makes the paint durable... at least for rattle can. The one piece of equipment that I need for this job is a blast cabinet so that I could proper job at removing the old stuff. Oh well this isn't a restore, it's a rebuild!
 

Attachments

#8 · (Edited by Moderator)
You are moving right along here. A good e-tank would help removing some of the rust too.
 
  • Like
Reactions: twostep
#9 · (Edited by Moderator)
I just read your thread and was thinking the same thing that Kenny was but you answered it lol . That's a pretty idea the factory did , I bet that plate helps keep the main deck from cracking and vibrations down , keep us up-date , Al
 
  • Like
Reactions: twostep
#10 ·
Kenny, I had actually hit Daniel up about using his e-tank but it's not big enough for the deck anyway. It would have worked great for the small parts. I would like to have a big one and might one day.

Al, I assume that the engineers designed the deck as thin as they could respectfully and then saw real fast that the spindle mount areas broke too easy so they came up with this reinforcement plate.

While I'm redoing it I might add a few stiffening ribs going from the anti-scalping wheels inward toward the center plate just to stiffen it up and help it last a little longer. I was really hoping that I would find one of the nicer fabricated Haben decks off of a super but it never happened. Hey, these things are 30 years old so after rebuilding if I can get another 15 years I'll still be way ahead of all my friends that go out and buy new box store mowers and have to replace the whole thing after a few years.
 
#11 · (Edited by Moderator)
did some more work to the deck today.
 

Attachments

#13 ·
Thanks, I'm not rushing too much since I've still got a couple of months but when I get a little time I do what I can. That bracket that I cut off was a real hack job... who knows how long it's been on there like that and it might have held up but it was not level with the other side (that is in great shape) so I figured I'd just cut a section out and patch it.

Brian,

The deck, even with that extra plate was still pretty warped up from 33 years of use. And also where the rear hangers bolt to it the deck was pretty stretched. I used the ball pein to flatten it back out and I'm actually going to cut out a panel out of 12ga to go on the bottom side to help strengthen it even more.

Here is the template:
 

Attachments

#14 ·
That will stiffen things up a bit more. Glad you have the time to think things through and make quality repairs.
 
  • Like
Reactions: twostep
#15 ·
Got the lower tins cut out now I just have a bit of trimming and then my least favorite tool in the shop... the hole saw!!! At least i now have a decent sized drill press that can really get the RPM's down low.
 

Attachments

#16 ·
Question for you experienced guys... how should I attach these new panels? of course I can weld and even throw in a few plug welds in the middle of the panel. Or should I use some sort of an adhesive/epoxy?

My only concern it rusting from the inside out.
 
#17 ·
The bottom one, I would make sure is sealed so nothing could get between and start rusting out. If you weld it, don't start at one spot and work around. Do a little weld and move elsewhere for more. It will keep warping down.
 
  • Like
Reactions: Sawdust and twostep
#18 ·
Thanks Kenny.

I'm thinking that I will paint the deck and the back side of the panel with the good Rustoleum Heavy Rust that I like, drill some plug weld holes, stitch weld the perimeter with 2" weld and then use seam sealer to seal the rest of the perimeter.
 
#19 ·
Sounds like a good plan. Just keep an eye on the seam sealer so it doesn't disappear. Lots of abrasion going on under there!
 
  • Like
Reactions: twostep
#20 ·
Got The patch finished and welded in. Got the bottom plate welded on... now just have a BUNCH of grinding to do.


Attachments

#21 ·
That looks good. Should provide extra support/strength for the deck.
 
  • Like
Reactions: twostep
#22 ·
Got the bottom plate finished. Also got the patch smoothed. Plus I like posting pictures... obviously.


Attachments

#24 ·
That looks great! A little paint and your in tall cotton!
 
#25 ·
Welded the wheel bracket back on, the welds aren't the prettiest but they are far better than the boogers that I ground off. Cleaned up the top for paint and then POR'd the bottom. Also got the wheels cleaned up and primmed. Now I'm off to source some new sealed bearings for the rear wheels.


Attachments

#26 ·
I think you are going to be very happy with this deck. Looking good!