Garden Tractor Forums banner

Toro GMT 200 / Hesston Front Runner

18K views 93 replies 8 participants last post by  Austen  
#1 ·
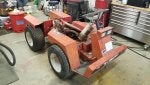
After a year and half I'm finally getting back to work on my Toro GMT 200. I purchased this in May of 2019 in North central Washington State. Here is the link for when I first purchased it. https://gardentractortalk.com/forums/topic/73962-my-newest-acquisition/?hl=toro+gmt+200

Here is what she looked like when I started today.


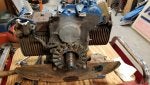
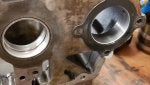
I purchase a used Kohler k532 at a tractor show about 1 years ago. It ran good when I purchased it but I think I will pull the heads and see what everything looks like before I put it into the tractor.

I pulled the old engine to see what difference there are between the two engines. It looks like I can switch over the oil filter adapter, engine coupler, and the pulley for the hydraulic steering pump driving at the back of the motor. I'm no sure about the exhaust yet. Do I keep the original type setup or go with something different.


Comparing the new and old engine.


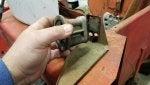
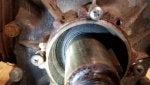
Engine to hydro coupler


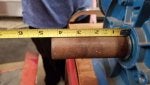
The crank is the same diameter but the new engine is 4.25 in. long while the old was only 2.75 in. Don't know if that will be a problem or if I will have to cut the extra length off. Don't think cutting the extra off will have any effect on how the engine will run.


Attachments

#2 ·
Here are some more pictures.

Under the engine I found the central pivot point. I removed the dust cover and everything looks good. I will remove the old grease and add some new grease.


I will remove the gas tank. Clean out the rust and dirt and hopefully it won't leak.


Some welding needs to be done on the bed.


Looks like it was bought in Spokane Washington.


Attachments

#4 ·
I was just looking at the engine tag on the new motor. I think is says k582 not k532. That means it's a 23 hp not 20 hp. I'm fine with that.
 
  • Like
Reactions: KennyP
#5 ·
I started taking the heads off of the replacement motor tonight. There was a fair amount of carbon build up on everything but that will clean up of easy enough. There was no indication of a leaky head gasket. The gaskets are in great shape so I will reused them. They have the fire ring. I did find 3 burnt valves. 2 exhaust and 1 intake. The guy I bought the engine from said he though it might have burnt valves so no surprise there. The valve seat look to be in good condition. I will lap the valves to the seats when I assemble it back together. The engines uses an early exhaust valve 48-01601. They're more expensive then the later models but I was able to find some for a reasonable price. The intake were about half the price of the exhaust. I'm also getting some Rust oleum Apple Red tomorrow so I can get the engine painted while I wait for parts.


The piston are standard and the cylinder walls look to be in great shape.


Attachments

  • Like
Reactions: KennyP
#6 · (Edited by Moderator)
Intake Valves should be the same as the K241-K341. Early Exhaust Valves should be the same as a K241, K301 and early K321.

I'm guessing yours has the smaller exhaust valves? Both intake and exhaust valves are Probably the same 1-3/8" intake and 1-1/8" exhaust valves that's in a K241, K301 and early K321.

Some of the early K321s had 1-1/8" exhaust valves then went to the larger 1-3/8" exhaust valve as well.

Just read that some of the early K582 valves were ground to a 30* valve angle. I would almost want to re-cut the seats to 45*/46* like the single cylinders which will drop the valve in the seat a bit deeper. That will keep them from burning up nearly as fast.

Do you know someone close by that might have a 45* cutter and arbor set that you could borrow for an hour or 2?
 
#7 ·
Intake Valves should be the same as the K241-K341. Early Exhaust Valves should be the same as a K241, K301 and early K321.

I'm guessing yours has the smaller exhaust valves? Both intake and exhaust valves are Probably the same 1-3/8" intake and 1-1/8" exhaust valves that's in a K241, K301 and early K321.

Some of the early K321s had 1-1/8" exhaust valves then went to the larger 1-3/8" exhaust valve as well.

Just read that some of the early K582 valves were ground to a 30* valve angle. I would almost want to re-cut the seats to 45*/46* like the single cylinders which will drop the valve in the seat a bit deeper. That will keep them from burning up nearly as fast.

Do you know someone close by that might have a 45* cutter and arbor set that you could borrow for an hour or 2?
I didn't even think about the angle of the seat being different. I just figured it was the size of the valve that was causing the cost to be so much more. I'm going to check with my brother about getting the seat cut to a 45. He may know somebody in the rat rod community that he's a part of that can help me.

Thanks for the information!
 
#8 · (Edited by Moderator)
I think I figured out what made the previous owner stop using this machine. While I was taking the starter off the old motor it fell off the engine. Look like the starter was hit causing the mounting plate for the starter to break. I will post pictures later. The first pictures is where the start mount should be. The second picture shows the broken piece still attached to the starter.


Here is what it should look like.


Attachments

  • Like
Reactions: Austen and KennyP
#9 ·
I removed the belt pully from the back of the old engine today. It doesn't have a set screw or a key to keep it from spinning on the crank. It has a 2 piece pully that wedges the pully against the crank when you tighten 2 small bolts. I've never seen a pully designed like this. I used a harmonic balance puller to get it off. I came apart very easily.

You can see the 2 small bolts in this picture.


It has 2 more threaded holes for the puller to attach so you can remove the inner wedge ring.


I also removed the oil filter adapter from the old engine. It has a drip tray that attached between the block and the filter adapter. Should make changing the oil less messy.


I also removed the hose bypass and fittings from the new engine. I need to order some new gaskets before I finish installing the filter adapter.


Attachments

  • Like
Reactions: Austen and KennyP
#10 ·
Those other two holes in the hub are so you can screw the small bolts in there and push the pulley off the hub.
 
  • Like
Reactions: Mark 149 J.
#11 ·
Those other two holes in the hub are so you can screw the small bolts in there and push the pulley off the hub.
Thanks

Had I cleaned off the crank it probably would have come off a lot easier.
 
  • Like
Reactions: Austen
#12 ·
I did more inspecting and clean up work today. First up was the front steering column. I popped off the front cover and found it to be dirty with wasp nest, corrosion on the switches, poor wiring fix, and needing some attention. The hour meter was also disconnected. Hopefully most of the switches will clean up.

Here's what it looked like.


I had my son remove the fuel tank so we can start getting it cleaned out. It's fairly thick steel so hoping for no rust holes. It was held on with one bolt and then it slid right off. Found the fuel filter had rusted out, a piece of plastic pipe in the tank, rusty shutoff valve, and dumped out a large pile of rust. Hopefully it cleans up good.


Attachments

#13 · (Edited by Moderator)
Found a broken hydraulic hose. Finally figured out that it should be attached to the steering ram. Luckily it was just a broken fitting that can easily be replaced. I took off the ram while I was at it. Looks to be in very good condition with no rust on the shaft.


The last thing I did was start cleaning the sheet metal of the engine. Had some pieces that were bent, rusty, and greasy. Went to work with a wire brush in my angled air die grinder. The air turned dirty very quickly. Happy with the progress.
 

Attachments

  • Like
Reactions: Austen and KennyP
#14 · (Edited by Moderator)
I did some more work on the engine today. Trying to get it ready for when all my parts show up. I've bought all 4 valves, gaskets for the oil filter adapter, fuel pump rebuild kit, valve seat cutter, wire brushes, and painting materials.


The valves are part number exhaust 48-01601. These are early production valves from the spec. number 36202 engine. They are not easy to find at a good price. They fit nicely in the valve guides. The intake are part number 235008. These are cheaper because a lot of the Kohler K single cylinders used this same valve. Both valves are a 45 degree angle not 30 like I was thinking.

I removed a lot of carbon from the valve seat areas and from the heads. I will be plaining the heads on a piece of glass and sandpaper to make sure the heads are flat. My son did clean up on the inside of the tin work. There was a lot of rust that needed cleaning and converted.


"isave tractors" sells the rebuild kit for these fuel pumps. They must have just started selling them because they didn't have them in the summer of 2019. The kit comes with a new gasket, spring and diaphragm for $10. That is a lot cheaper then a new pump. I've used their parts before without any problems.


Attachments

#15 ·
My valve seat cutter arrived tonight so I took it to the shop to cut some seats. I'll do a separate right up about it later once I have a better feel for it. So far, I'm happy with it but I've only done one exhaust seat. I'm not an expert on cutting seats so I refreshed what I learned in engine rebuild class, I took 30 years ago, by watching some youtube videos. That was very helpful. The import thing to remember is keep the valve seat centered on the valve face. This way heat dissipates from the valve to the seat and thus into the block. This will reduce the chance of a burnt valve. You can use a dry erase marker on the valve seat to help you see how they touch.


I will still lap the valves when I'm done to ensure a nice tight seat.
 

Attachments

#16 · (Edited by Moderator)
I decided to measure the cylinder bores of this engine. I measured at the top, middle, and bottom of the stroke. I also did two measurements 90 degrees from each other at each position. The bore should be 3.500 inches with a max at 3.503 inches. The max that I found was 3.501 inches. The pistons have very little movement at any position in the stroke. After talking to my friend I've decided to pull one piston out and have a good look at the rings. Maybe it will help explain why I've seen a lot of oil getting past the rings when it sits. It will also give me a chance to see the bearing on the connecting rod.

I also decided to remove the flywheel (Don't use a jaw puller, use a harmonic puller) and stator to make it easier to handle when I remove the oil pan. These are a heavy engine so any extra metal you can remove makes life easier.


Attachments

  • Like
Reactions: 29 Chev and KennyP
#17 ·
Removed one of the pistons. The top ring gap and the oil ring gap were lined up at about the 2 o'clock position. Everything looks good. The oil ring is a 2 piece design that I've never seen before. I think I will just hone it out a little and replace the rings. Can't hurt at this point.


This sat behind the oil ring. It has an inner wire that slides into an outer like spring.


This is top and bottom of the oil ring.


Attachments

  • Like
Reactions: 29 Chev and KennyP
#18 · (Edited by Moderator)
Lots of work done today. Started up a fire first.


Modified the seat cutter so I could attach it to my drill on slow speed. Worked great.


I only have the exhaust valves so I cutting those seat first. Once I cut them I also lapped them into the seats. It's a long process but a necessary one if you want the valves to seal properly.

After cutting.


After lapping.


Here is the second exhaust valve.


Here they are together. I think they turned out good.


Planed both heads on a piece of glass, some sand paper, and water,

Here is the first one.


Second one is also finished. Took be about 50 min to do both.


Attachments

#20 ·
Making good progress. A light honing and new piston rings should ensure good compression and remove any concern about oil leaking by them.
 
#21 ·
Making good progress. A light honing and new piston rings should ensure good compression and remove any concern about oil leaking by them.
Because I've decided to put new rings in this engine, I do plan on honing it. I've decided to take the engine apart so debris from the honing doesn't get into the bearings, cam, oil pump, or crank. It will me much easier to clean out and it will let me further inspect other parts more closely. I ordered a complete gasket and seal set from isavetractors. I will see if they're as good as the rest of the parts that I've bought from them. Now I have to wait even longer for more parts to arrive.
 
  • Like
Reactions: KennyP
#22 ·
Will give you time to take the engine apart and inspect / clean up things in preparation for the arrival of the new parts. Lots of soapy water and rinsing should suspend and make removal of any debris that results from the honing easy and then a light coat of oil which I am sure you already know.
 
#23 · (Edited by Moderator)
Disassembled the rest of the motor. Comes apart fairly easy. I haven't found any video's on how to rebuild these engines and the service manual is rather poor on how to dissemble it. Here is what I figured out. You must remove the gear cover first. Start by removing the governor/timing assembly. Then remove the bolts that hold the gear cover on and the key out of the crank.

Gear cover and Key


Governor


Here are the timing marks. One on crank and two on the cam gear.


Remove the large cam nut. Lightly tap the cam gear off. Lift back the solid lifters and pull out the cam.

Sorry no pictures.

Remove the 2 bolts that hold in the oil pump.


Remove the 3 bolts that hold on the gear cover plate.


Remove the c clip that holds the timing gear on the crank.


To get the timing gear off the crank, remove the 4 bolts from the back closer plate. and use a dead blow hammer on the timing gear end pushing the back closer plate off and removing the gear as well. (Edit the key on the crank for the timing gear put a small scratch in the bearing plate. I would not do it this way again. I would use wooden wedges to remove the gear next time. Remove the timing gear key and then push the crank back out through the opposite end.)


There is lots of room to remove the solid lifter once the crank it out.


Here is the cam and crank front bearing.


I will start cleaning, inspecting, measuring up everything tomorrow.

If you have rebuilt one of the K532 or K582 engines please feel free to let me know any tricks or advice.
 

Attachments

  • Like
Reactions: Austen and KennyP
#24 · (Edited by Moderator)
Started cleaning and inspecting everything. Started with the crank. Tried to remove the end plate by removing this large C-clip. Bought a larger C-clip pliers but it still wouldn't take it off. I need this plate off so I can replace the crank seal.


Measured the crank journals and the connecting rod large end and everything is within specs. Hopefully I'm done buying parts!


Next up was honing. First time using this Leslie hone that I bought 3 years ago. Once I figured out how to set it up and properly adjust it we got right to work and did both cylinders.


Here you can see the cross hatch for both cylinders.


Attachments

#25 ·
Could always make your own tool to remove the C clip. Two pieces of round stock or grade 5 bolts ground or turned down at the end to the right size to fit the holes at the end. Weld each one to a piece of flat steel and drill a hole in each piece to form a pivot point - worn out pair of large vise grips might work as well. Just a suggestion to try if you cannot find a big enough snap ring tool.
 
#26 ·
Could always make your own tool to remove the C clip. Two pieces of round stock or grade 5 bolts ground or turned down at the end to the right size to fit the holes at the end. Weld each one to a piece of flat steel and drill a hole in each piece to form a pivot point - worn out pair of large vise grips might work as well. Just a suggestion to try if you cannot find a big enough snap ring tool.
Good suggestion. I might have to do that if I can't find what I need for the right price.
 
  • Like
Reactions: KennyP