Garden Tractor Forums banner

Bolens G10

7.5K views 49 replies 5 participants last post by  Dave in NY  
#1 ·
Today I decided to work on a late model G10 that was given to me several years back. I had it running and driving soon thereafter but it had multiple issues and being a 3-speed with no locking differential I didn't feel like investing much money into it. Fast forward to the present and I've come to the realization that I've got too much junk. I hate scrapping things that are fixable so I figured I could get this one going and (maybe) send it down the road.

The main issue was the cracked front axle cradle/support. I've disassembled a few true parts machines over the years and I happened to have an extra one on hand. It's an older one that hasn't been 'lightened'.


I didn't like the look of the front axle pivot pin so I fashioned a new one out of some old 5/8" round stock. Not too bad considering I used an angle grinder and cordless drill. Shameless plug in the last shot for my Maxim 728 snow thrower. Weighs more than a tube frame for sure.


I noticed the front axle pivot bore wasn't drilled for a grease fitting, another cost cutting measure. I addressed that as well. I had started to counterbore it with a larger drill bit to match my other machines but I soon decided against it. Maybe someday when I fix the drill press...


Another big issue is with the exhaust port on the motor. It appears that the original exhaust pipe loosened up, rattled around and enlarged/elongated the pipe threads. There's also a ring around the flange that would prevent a good seal. Thankfully the flange bolt threads are okay, so I'm thinking I may be able to file it down flat. If so I have a bolt-on pipe flange that I can use. After looking at the pictures I noticed a hole inside the exhaust port. I'm not sure if it exits the side of the block or not.
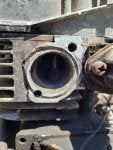

If all else fails, I have a similar Briggs 11hp that I could try. I'm going to have to take parts from it regardless as this tractor didn't come with a blower housing and I 'borrowed' the carburetor for another project. Alternatively I've also been toying with the idea of putting a small 5hp Briggs on it and relegating it to light duty jobs. With fuel prices going the way they are that might not be a bad idea.
 
Discussion starter · #3 ·
Agreed, it would likely be my best looking tractor after a power wash. It also has the tightest steering of any tube frame I've had. I don't think it was used much before the cradle broke and it was put out to pasture.

It's going to need a new ignition switch and wiring. That should be a very simple job with one of these tractors, especially if I eliminate the safety switches. But I may consider adding lights. I noticed one axle seal leaking and a nice dent on the driveshaft brake drum. I've never worked on one of these 3-speed tractors but I figure this is a good one to practice on before finally getting to the 600.

Didn't you have a 5hp on one of your tractors for a while? I'm guessing you only used it to test things out.
 
Discussion starter · #6 ·
I decided to go with the 11hp Briggs. It's complete and doesn't appear to have much run time. It also has the "Oil Gard" system and a 10 amp stator with a regulator so I won't have to deal with the original dual circuit setup. It's a slightly better motor than the original, having a replaceable sleeve bearing on the PTO end versus a plain bearing. Thankfully it was stored with a drained fuel system so the only thing I really had to do was change the fuel lines and clean up after Fluffy before I had it running. I'll be changing the exhaust and air cleaner setups at a later time.


I also upgraded the rear wheels to lug nuts after freeing up the freewheel pin. The lugs could probably be a little longer but the price was right.


I freed up the PTO linkage and replaced a few roll pins. The parking brake lever is next. Actually the entire brake system needs attention. I ordered a new driveshaft brake drum but I'm not sure what to do about the broken torsion spring on the brake rod assembly yet.


I think I'm making her uglier. If I get the motor pulley swapped over I may be able to try her out a bit tomorrow.
 
Discussion starter · #9 ·
Freed up that parking brake lever, installed the motor pulley, filled her up with new oil and drove her around a bit. She definitely looks promising. The muffler even came out with no fuss. I was planning to change out the air cleaner to the original one so the hood would fit but the mounting rod threads are different. I might make a new rod or just Helicoil it, not sure yet.
 
Discussion starter · #11 ·
Still no pictures for today. I managed to get the stock air cleaner setup installed. The rod that came with the motor was longer, so I simply added more threads then cut it to length. I also found that the dipstick the motor came with won't work with the tractor's heat shield. It sits too high. I swapped the original over only to find that apparently Bolens ground the cylinder head for clearance. The head of the dipstick won't sit in the tube otherwise. I started grinding on the new motor with a Dremel but I ran out of time. It still needs a bit more work.

I don't have any good hood hinges around and this tractor needs one. Does anyone have any good suggestions?
 
Discussion starter · #14 ·
Yep, it's common issue for sure. That's why I don't have any extras lying around. Actually this tractor came with a good hinge but I stole it to use on a 1556 I fixed up. Honestly I never thought I'd be getting this G10 going again. I was thinking about checking to see what the box stores had but I'm afraid they'd be too flimsy.
 
Discussion starter · #22 ·
Good news on the hinge front. I found a good looking one on a 1250 hood I'd forgotten about. It's locked up now but I should be able to free it up.

I finished butchering the head for dipstick clearance today. I'm fairly certain Bolens did this as the Briggs & Stratton parts list makes no mention of a special head or dipstick for the original motor. The black head is the original for reference. As you can see I went a little too far on the bottom but it's harmless.


Original air cleaner adapter mounted. I used a square cut o-ring between the carb and adapter. Also note the ugly but cheap exhaust.


Got the heat shield to mount after fiddling with the exhaust and moving the gas tank forward a skosh. I much prefer these metal tanks. Yes, I know she needs a new tire or four.


Once the new ignition switch comes in I can get the tower mounted and start the wiring job. I've already removed everything related to the safety switches.
 
Discussion starter · #28 ·
It's looking more like a tractor now. I used a propane torch and some water quenching to free up the hood latch, then got the hood mounted. It barely closes with that Briggs metal gas tank on there. I also replaced both broken rubber hood latches. I knocked out the hole plug in the dash added an ammeter in preparation for the wiring job. I then made a new throttle cable from a longer one I salvaged at some point and hooked it up along with the choke cable. Tomorrow's looking like a yard work day unfortunately, but I'm not expecting an ignition switch for a few days.

 
Discussion starter · #30 ·
Wiring is not my forte, but I got the basics done. She starts, runs and stops with the key. She also appears to charge going by the ammeter. The lights will have to wait for another day. The 12 gauge I used is overkill but it's what I have on hand. I actually saved it from when we were cleaning out my late father-in-law's barn. He got me into tractors (gifted me my first 1050) so I'm sure he'd be happy to see it being used in one. I've learned to always solder and heat shrink my connections. It takes a lot longer but it's worth it in the long run. I made the battery cables by cutting down longer 'junk' cables then adding new ends. It looks like I should shorten up the positive cable a bit more. I got the battery from a buddy of mine that picked up a tractor for scrap. After seeing the date on the sticker I can't believe it still works. This is turning out to be cheaper than I was expecting.

 
Discussion starter · #36 ·
I decided to tackle the right side axle seal today. Drained the gear oil and found it was almost pristine. Of course the drive collar was rusted on, but the Posi-Lock got it off. Turns out some of the axle threads are stripped out. I cleaned them up the best I could with a rethreading die then ran the nut back and forth many times until I could finger tighten it. Can't break what's broken. Thankfully it seems to hold. If it doesn't I can probably add spacers so the nut rides on some good threads, then drill a new hole for the cotter pin. Finished cleaning up the axle, the bores of the drive collar and the freewheel pin. Found the two bronze bushings in the free wheeling hub were shot so I replaced those as well. Greased everything up and put it back together.


I swapped out the bulging front tire and threw a tube in the other side. Unfortunately the rears are too far gone for my liking. I have some nice Carlisle 6-12s I acquired for another project but probably won't get to anytime soon, so I tossed one on just to see how it looks. I've always liked tall narrow 'pizza cutter' tires. What do you all think? I also have a pair of the standard Goodyear 23x8.50s but they'd need a set of tubes.
 
Discussion starter · #38 ·
Me too, that's why I transferred four onto it. (y)


Not much else to report as of late. Today I finished changing the axle seals, filled her up with some fresh 90W GL1 and drove around a bit. I'm hoping to remove the driveshaft soon so I can repack or replace the bearing, change the input seal and finally get the PTO back on.
 
Discussion starter · #40 ·
It's been a while. I'm afraid I've been distracted by a pair of new acquisitions. I traded a Simplicity Sunstar for a Bolens 1463 (1400G) and a Power King 1614. It's my first medium frame, and I've always wanted a Power King. I've got both running and driving, but that's only the beginning.

I did manage to change the driveshaft bearing since I destroyed the old one in the process. The drive pulley was really rusted on there, it took hours of soaking and heating to finally get it off. I know to take it easy, I've broken more cast iron pulleys than I'd like to admit. I found that regular bolts were used to attach the bonded coupling to the shaft coupling. Regular bolt heads won't sit in the bonded coupling's recesses like socket head screws will, so it was twisted from engine torque. I need to paw through my parts collection to see if I have another one.
 
Discussion starter · #43 ·
True, temporary repairs often have a way of becoming permanent. Or passed on to somebody else. I'm sure we're all guilty of it. Sometimes the proper repair on a rusty old tractor you picked up for $50 isn't economically wise or feasible. If the tractor can still do some work, anything beats sending it to the scrap yard.