

Today I decided to work on a late model G10 that was given to me several years back. I had it running and driving soon thereafter but it had multiple issues and being a 3-speed with no locking differential I didn't feel like investing much money into it. Fast forward to the present and I've come to the realization that I've got too much junk. I hate scrapping things that are fixable so I figured I could get this one going and (maybe) send it down the road.
The main issue was the cracked front axle cradle/support. I've disassembled a few true parts machines over the years and I happened to have an extra one on hand. It's an older one that hasn't been 'lightened'.
![]()
![]()
![]()
I didn't like the look of the front axle pivot pin so I fashioned a new one out of some old 5/8" round stock. Not too bad considering I used an angle grinder and cordless drill. Shameless plug in the last shot for my Maxim 728 snow thrower. Weighs more than a tube frame for sure.
![]()
![]()
![]()
I noticed the front axle pivot bore wasn't drilled for a grease fitting, another cost cutting measure. I addressed that as well. I had started to counterbore it with a larger drill bit to match my other machines but I soon decided against it. Maybe someday when I fix the drill press...
![]()
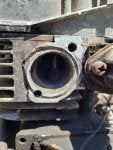
Another big issue is with the exhaust port on the motor. It appears that the original exhaust pipe loosened up, rattled around and enlarged/elongated the pipe threads. There's also a ring around the flange that would prevent a good seal. Thankfully the flange bolt threads are okay, so I'm thinking I may be able to file it down flat. If so I have a bolt-on pipe flange that I can use. After looking at the pictures I noticed a hole inside the exhaust port. I'm not sure if it exits the side of the block or not.
![]()
![]()
If all else fails, I have a similar Briggs 11hp that I could try. I'm going to have to take parts from it regardless as this tractor didn't come with a blower housing and I 'borrowed' the carburetor for another project. Alternatively I've also been toying with the idea of putting a small 5hp Briggs on it and relegating it to light duty jobs. With fuel prices going the way they are that might not be a bad idea.
![]()
The main issue was the cracked front axle cradle/support. I've disassembled a few true parts machines over the years and I happened to have an extra one on hand. It's an older one that hasn't been 'lightened'.


I didn't like the look of the front axle pivot pin so I fashioned a new one out of some old 5/8" round stock. Not too bad considering I used an angle grinder and cordless drill. Shameless plug in the last shot for my Maxim 728 snow thrower. Weighs more than a tube frame for sure.


I noticed the front axle pivot bore wasn't drilled for a grease fitting, another cost cutting measure. I addressed that as well. I had started to counterbore it with a larger drill bit to match my other machines but I soon decided against it. Maybe someday when I fix the drill press...

Another big issue is with the exhaust port on the motor. It appears that the original exhaust pipe loosened up, rattled around and enlarged/elongated the pipe threads. There's also a ring around the flange that would prevent a good seal. Thankfully the flange bolt threads are okay, so I'm thinking I may be able to file it down flat. If so I have a bolt-on pipe flange that I can use. After looking at the pictures I noticed a hole inside the exhaust port. I'm not sure if it exits the side of the block or not.

If all else fails, I have a similar Briggs 11hp that I could try. I'm going to have to take parts from it regardless as this tractor didn't come with a blower housing and I 'borrowed' the carburetor for another project. Alternatively I've also been toying with the idea of putting a small 5hp Briggs on it and relegating it to light duty jobs. With fuel prices going the way they are that might not be a bad idea.


")


